Before the wiring and the flux capacitor, there was the idea. Go back to where it started—or jump into the shop.
STORY SELECTOR01 / 02
FLIP THE SWITCHORIGIN SELECTED
ORIGIN STORY / 29 PHOTOS
Long before the flux capacitor.
FROM NOTEBOOK PAPER TO STAINLESS STEEL
28 years. One day early.
The childhood notebook page dated October 3, 1997, with favorite cars and gullwing-door drawings.
THE NOTEBOOK
MONTHDAYYEAR
↓ 28 YEARS. MINUS ONE DAY.
PICKUP DAY
MONTHDAYYEAR
I wrote this notebook entry on October 3, 1997. My favorite cars: Lamborghini, DeLorean and Ferrari. There’s the DeLorean, on notebook paper, with the gullwing doors drawn open.
On October 2, 2025, I picked up my stock DeLorean. Almost exactly 28 years after I wrote that entry. One day shy, to be precise.
A lot changed in between. Wanting that Time Machine wasn’t one of them.
EARLY YEARS / THE MARTY ERA
Even if he was a slacker.
I’m not sure when I watched Back to the Future for the first time, but I know it created a lot of milestones in my life.
At the age of 10, during my first ever guitar lesson, I told my teacher I wanted to learn Johnny B. Goode. I remember holding onto the backs of cars in the neighborhood on a skateboard. I thought the coolest person you could be in the world was Marty McFly, even if he was a slacker.
I was in bands that went nowhere—because maybe I just wasn’t cut out for music. I desperately wanted to make a real-life hoverboard, and I’m sure the plans are in a stack of notebooks somewhere.
“If Time Travel were possible, why wouldn’t I go back and see if my Dad and I would get along?”I thought it then. I still think it now.
AS I GOT OLDER / THE DOC ERA
Somewhere along the way, I became more of a Doc.
As I got older, I definitely found myself aligned more with Doc Brown than Marty. I got really into science and technology.
The guitars hang on the walls and collect dust while Tesla Coils, MOSFET Drivers, chemistry equipment, diodes and relays litter my workstation.
I’ll watch or read anything that has to do with space, time-travel, or Spacemen from Pluto. I’m a self-described mad-scientist tinkerer with a constant nagging desire to pull things apart and see how they tick.
The spark was back.
When I was a kid, there was nothing cooler than the DeLorean Time Machine. In college, my peers talked about owning Lambos or Ferraris when they ‘hit it big.’ But one thing stayed constant during my journey down the space-time continuum: I wanted that stainless steel, Doc Brown-ified mess on wheels.
‘You know the car is really slow.’ ‘It’s a piece of garbage.’ ‘It can’t really go 88.’ ‘It’s an automotive nightmare.’ Pick your poison. No matter what people told me, it was a dream of mine to one day find myself in a Plutonium-Powered Time Machine.
When I lived in Los Angeles during the 2010s, I frequented the Petersen Automotive Museum. One day, the screen-used A-Car from the movie finally arrived on display.
I’ll let my facial expressions tell you how I felt during this meeting in March 2017. The spark was back. I wanted this car.
I’ll let my face do the talking. The Petersen, March 24, 2017.Explore all 6 photos +
This had to be MY car.
Fast-forward through decades of looking on eBay or Craigslist during lunch breaks, or scrolling my phone at night. On June 14, 2025, I finally had my opportunity: VIN 5172 was for sale about three hours away from me, already converted into a Time Machine. The asking price was high, but I didn’t care.
I remember sitting in the car and the salesman shutting the gullwing door over my head. The roof liner sagged onto my head and barely any of the electronics worked. But I wanted it so badly that I put a deposit down almost immediately.
Hell, nobody in the dealership could even figure out how the Time Circuits worked until I showed them. This had to be MY car.
With DeLorean Orlando just down the road, I called the manager to make sure they worked on converted cars. I’d only worked on American cars up to that point—never a rear-engine car, let alone one with such a short production run and hard-to-find parts. He assured me they did, then asked for the VIN so he could do some preliminary checks.
Things weren’t looking so good for #5172. I was told my budget would be very much inflated by what the car needed, and that I’d probably need to redo most of the Time Machine parts as well. Talk about heavy.
June 14, 2025: sitting in VIN 5172, the converted Time Machine I nearly bought.
Almost as if it was my density.
DeLorean Orlando just happened to have the perfect car for me. It was being fully restored from nearly the frame up, and on June 26, 2025, I became the owner of VIN #6030.
This one was a stock DeLorean. The Time Machine would come later. First came a long journey of patience while the restoration continued.
VIN 6030 at DeLorean Orlando on June 26, 2025. This one was mine.Explore all 7 photos +
That's why you're the Doc, Doc.
Robert Gadocha, the manager of DeLorean Orlando, recommended I talk to Bruce Coulombe of Coulombe Enterprises. Back to the Future, Jurassic Park, Ghostbusters, Knight Rider, Lost in Space—basically, if you’re interested in building a nerd-mobile, he’s your Obi-Wan Kenobi.
Bruce is an absolute master of the prop-making craft. After our first four-hour meeting, I knew I’d made the right choice. On July 2, 2025, I sat in one of HIS Time Machines at his shop. Now I KNEW. There was no way that other car was my car. Bruce was going to do the tinkering here.
Somewhere between the sound effects, wiring diagrams, smoke systems and props, I mentioned that I was fairly handy with tools. Once the restoration was done, I’d love to come up once or twice and get my hands dirty.
Bruce was kind and welcoming. If you REALLY know Bruce, though, I can only imagine his internal monologue: ‘This kid is going to come in here, damage or misplace my tools, and think there are right-handed and left-handed screwdrivers.’
Either way, the road was paved. Even if where I was going, I didn’t need roads.
Sitting in one of Bruce Coulombe’s Time Machines at his shop, July 2, 2025.
The drawing was in the driveway.
On October 2, 2025, I got the call: my car was done at DMC Orlando. I probably could have RAN to their office faster than I drove over.
Pulling away in my beautifully restored DeLorean was one of the happiest moments of my life. It was the first time I’d ever driven one. Twenty-eight years, minus one day, after that notebook entry.
Over the next few months, I enjoyed the hell out of the car—even when it had maintenance issues. The warranty came in really clutch here. I drove it to shows, across the state, to the mailbox. The destination never mattered.
I’d accomplished something I’d put my mind to, nearly 30 years in the making. And yes, even the dog got a turn in the passenger seat.
Picking up the stock DeLorean on October 2, 2025.Explore all 6 photos +
The goal was owning THE DELOREAN.
On January 31, 2026, I brought the car to Bruce’s shop and dropped it off. He took one look at how beautifully sorted it was: ‘Are you sure you want to start drilling holes in this thing? This is a really gorgeous car.’
But the goal wasn’t to buy a DeLorean. It was owning THE DELOREAN.
The restored DeLorean on January 31, 2026, the day I dropped it off at Bruce’s shop.
FROM THE ARCHIVE
A few more stops along the way.
A printed snapshot, a seat in a Time Machine, and a few moments out with the DeLorean. These photos don’t have recorded dates, but they belong in the story, too.
An older printed photograph beside a DeLorean Time Machine.Explore all 5 photos +
On my first day in the shop, Bruce gave me a list of things to do. I like to think he figured it would keep me busy for a few hours. I got them done in 20–30 minutes. At that point, he asked:
“Do you want to build this car yourself?”
And the rest is history.
Now, I CANNOT take credit for the entire car. Bruce and his team did things I could never do: sourcing impossible-to-find props, welding work and plenty more. But I did build 90% of this car myself, and I’m very proud of that.
“If you put your mind to it, you can accomplish anything.”Indeed.
THEN CAME THE CONVERSION.
Time to build a Time Machine.
01The teardown
At least it’s started!
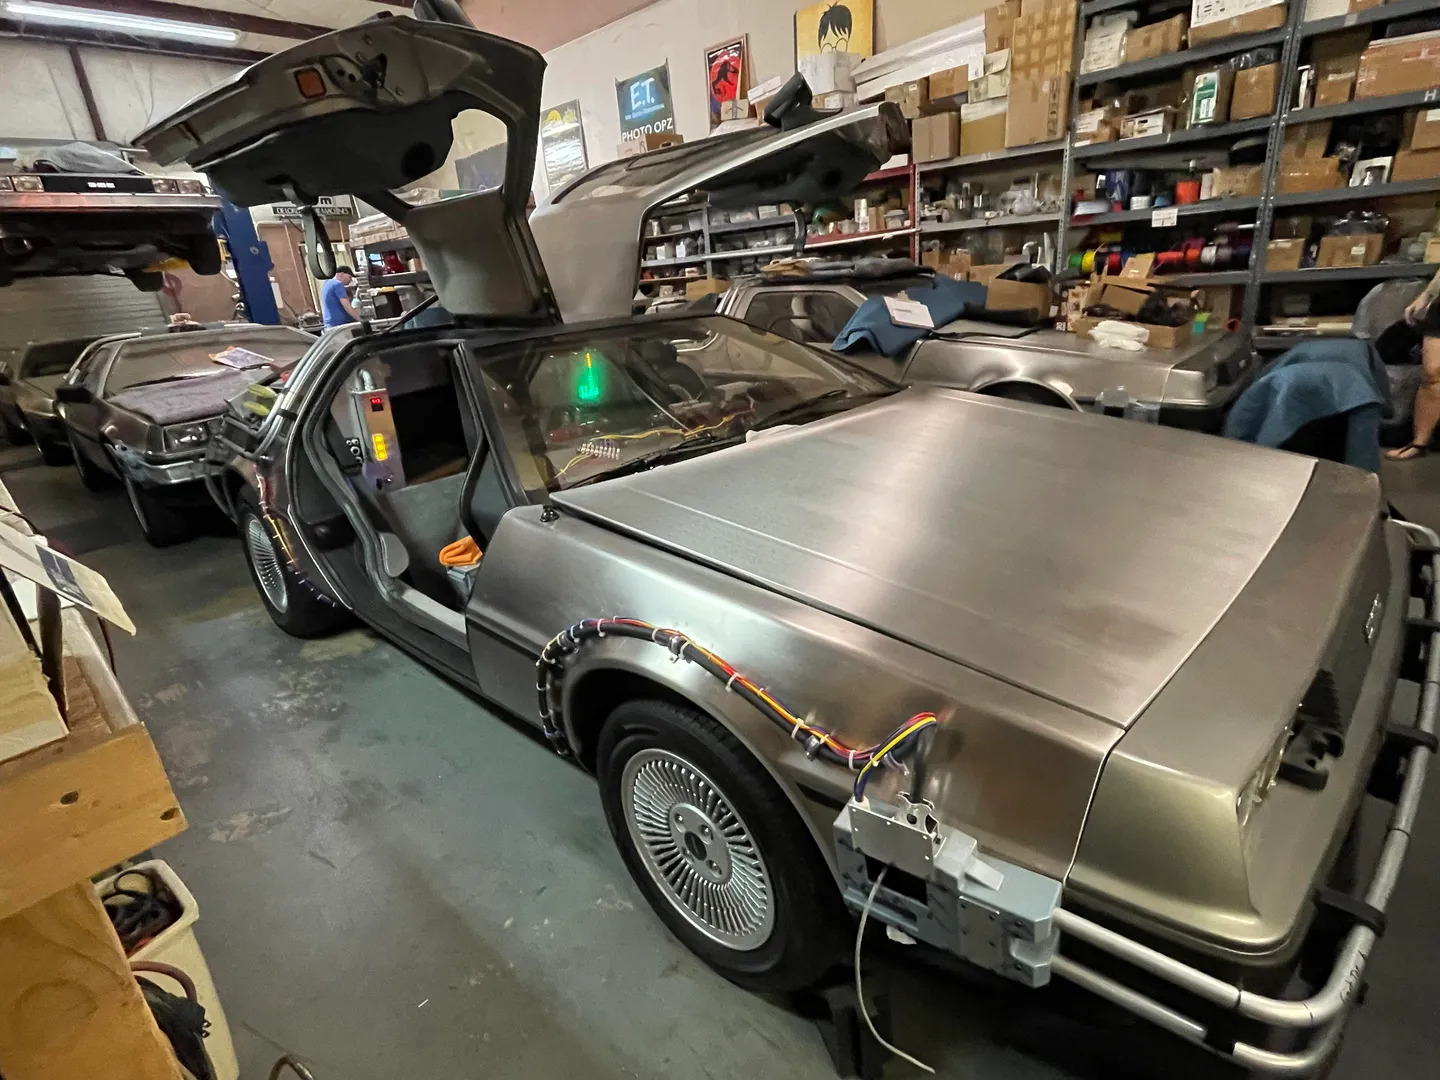
First things first: the trim, center console, seats and binnacle came out. I added a digital speedo, signal amplifiers and the 95 mph sticker to the stock speedometer.
The rear windows were gone, too. A steel plate would cover the engine and give the reactor, cooling vents, accumulator tubes and the rest of the rear-deck hardware a place to live.
Doesn’t look like much now, but at least it’s started!
The stripped cabin, with the seats and center console removed.Explore all 5 photos +
I ran almost all of the wiring today. Almost. I forgot two wires for the exhaust vent lights.
The flux band tubes and boxes were installed, still waiting on lighting and mesh. The overhead assembly went in with a real-deal Grimes light, and the rear deck started coming together: reactor thermal control, cabin atmosphere and fire control, plus power control and temperature regulators on the passenger pontoon.
I even ran the backup camera wiring and mounted the camera above my license plate. With the wiring done—almost, two more wires—the rest of the install should happen fairly quickly!
Rear bulkhead panels and hardware going in behind the seats.Explore all 9 photos +
●Flux boxes, overhead assembly and rear-deck systems take shape.
Exciting day today. I wired up the TFC, added the plutonium gauges and the time circuits display. The SID display and heatsinks went onto the rear bulkhead, too.
Then I drilled the holes to mount the flux capacitor. It wasn’t in yet, but that moment was getting closer—and it was going to be insane.
Next up: more engine-deck props, including the plutonium reactor, and getting the exhaust fins positioned so I could swap between the Part I and Part II car easily.
The time circuits display and center-console wiring in place.Explore all 7 photos +
●Time circuits and plutonium gauges go in. A spot is ready for the flux capacitor.
Turning the control arm and seeing the time circuit display light up was definitely a highlight of the build so far.
I wired up the High Voltage Regulator, SID, TFC switch and digital speedo today. There was still plenty to do, but now I could sit in the car, turn that arm and watch it come to life.
THE SWITCH-ON / 30 SECONDS / SILENTThe illuminated overhead console and time circuits during the May 2 switch-on demonstration.
The exhaust vents got their lights, controlled by a switch on the TFC box so I could turn them off. I added lights and a speaker to the reactor base, too. Once fully wired, opening the reactor or Mr. Fusion would trigger a hiss, crackling and other sounds.
I used some spare vents lying around to position the deck and drill the wiring holes. Really exciting to see what was coming! My actual vents were still being welded and would be among the last pieces to go on, along with the flux capacitor.
Inside, I wired the door plungers for the door-opening sounds. And the avionics bay was looking beautiful. That neat, easy-to-track wiring was all done with care by Bruce Coulombe—I can’t take credit for that work!
The reactor base glowing amber during a lighting check.Explore all 6 photos +
●Vent lights, reactor lighting and door sounds join the build.
Spent the whole weekend in the shop and got a ton done, including the FLUX CAPACITOR!
Saturday was all exterior wiring and tubing, connecting the front flux boxes to the ones on the roof. Something I thought would take a couple hours quickly consumed the entire day. I added some hoses to the rear deck, too.
On Sunday I finished the wiring underneath the rear of the car. Then came the long-awaited assembly and installation of the flux capacitor. I also wired indicator lights from the TFC drive to the overhead console so I could tell which exterior lights were on.
Still waiting on the rear vents and flux bands, but the big one was finally in.
The illuminated flux capacitor, finally installed on the rear bulkhead.Explore all 14 photos +
●The flux capacitor is assembled, installed and illuminated.
Took a couple weekends off, then got back to the build. Most of this weekend went into the rear bulkhead: a switch to turn off the flux capacitor’s crackling sound, the Torin blower and the relay banks.
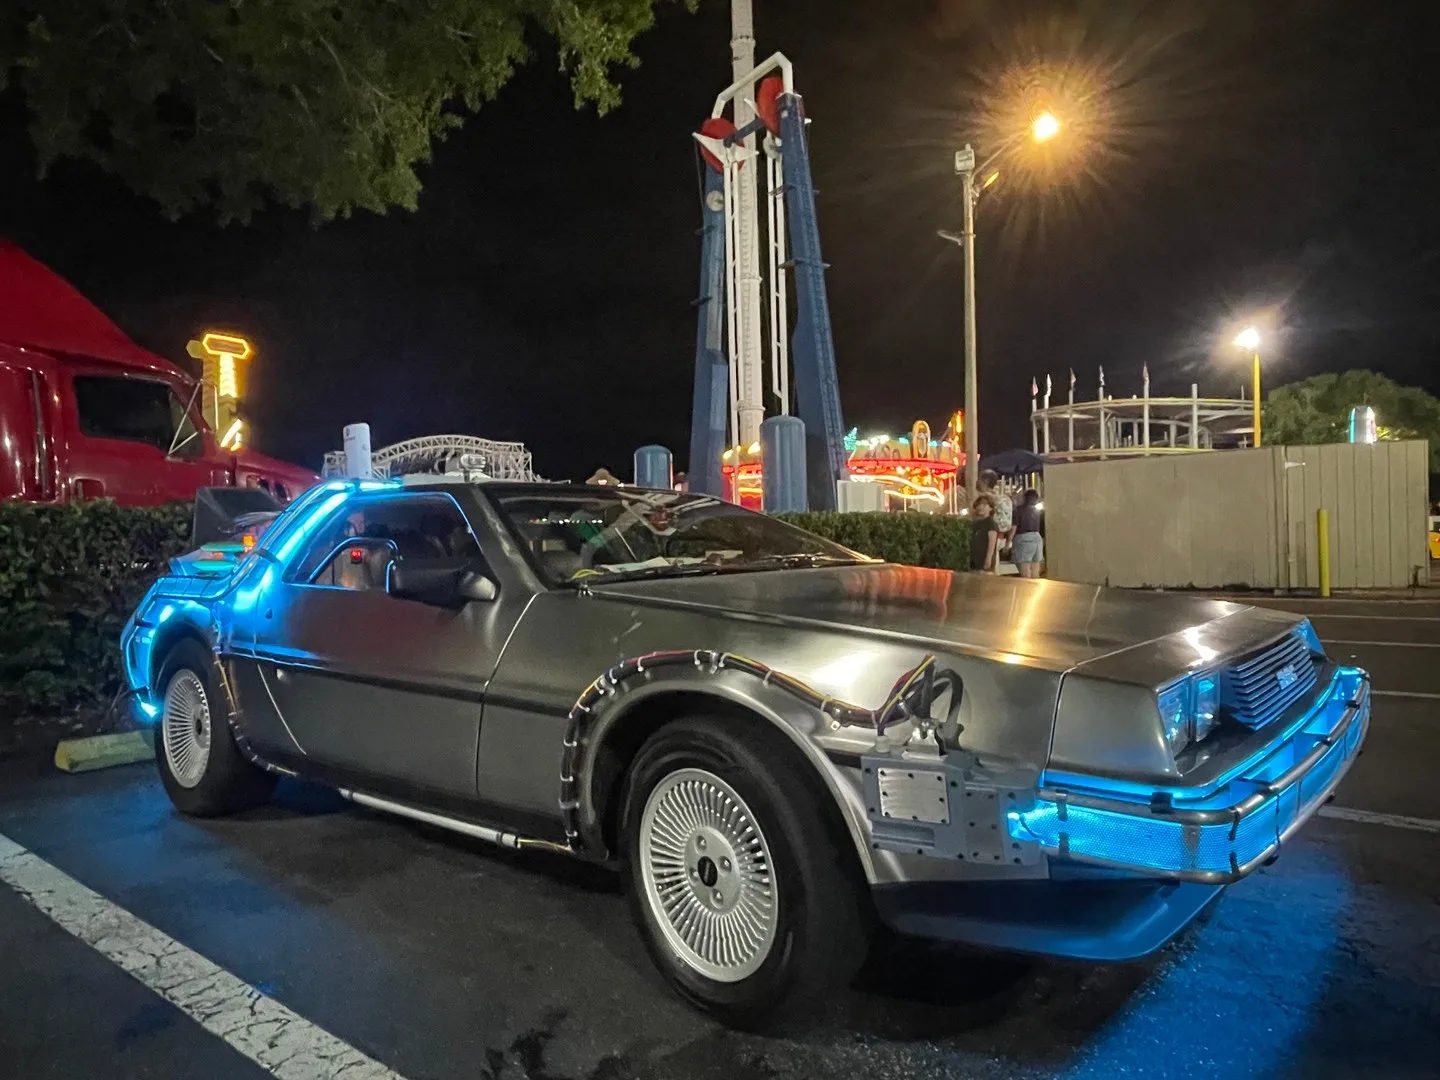
For the blower, I added a diffuser and a ring of LEDs tied into the flux band module. It would match the bands and let me see their color from inside, so I didn’t accidentally drive around with red or blue bands. One switch on the TFC arm could kill both for a more movie-accurate look. I know the Torin blower didn’t light up, but I think it looks cool.
The reactor got more lights and effects. The plan was a hum and a change from yellow to red when adding plutonium; with Mr. Fusion attached, sound effects and maybe fog or steam for the banana peels and beer cans.
Still on the list: weather the vents, finish the reactor top and Mr. Fusion, add a few more hoses and wires… and put my seats back in the car, haha.
The rear of the car with the exhaust vents in position.Explore all 6 photos +
●Rear bulkhead details, a glowing blower and more reactor effects.
Built and installed Mr. Fusion and added the flux bands. The final wiring and tubing went onto the rear deck, too.
The list was getting shorter: finish the plutonium reactor top for when I’m driving a Part I car, wire a few interior props and re-install my driver seat.
That’s where this run of shop updates leaves off. Mr. Fusion was on, the bands were in, and there were still a few things left to finish.
The DeLorean in the workshop with the flux bands installed.Explore all 10 photos +
●Mr. Fusion and the flux bands are installed. A few final jobs remain.
John’s story, in his own words, alongside his childhood notebook and photo archive. The build journal is adapted from his original updates, with dates following the work described.